How to Remove Acrylic Nails with Gel Polish: A Comprehensive Guide
Acrylic nails, known for their durability and stunning appearance, often come with a layer of gel polish for added shine and longevity. However, when it’s time to remove them, the process can seem daunting. Improper removal can lead to damaged natural nails, making it crucial to understand the correct techniques. This guide provides a comprehensive, step-by-step approach on how to remove acrylic nails with gel polish safely and effectively, ensuring your nails remain healthy and strong.
Understanding the Challenge
Removing acrylic nails with gel polish involves dealing with multiple layers of artificial enhancements. The acrylic itself is a hard polymer, while the gel polish is a resilient coating designed to resist chipping. Combining these two creates a formidable barrier that requires a strategic approach to break down without harming the underlying natural nail. Attempting to peel or force them off can strip layers of your natural nail, leading to weakness, thinning, and potential infections. Therefore, patience and the right tools are essential.
Essential Tools and Materials
Before you begin, gather all the necessary tools. Having everything within reach will streamline the process and prevent unnecessary delays or improvisations that could damage your nails. Here’s what you’ll need:
- Nail Clippers: For trimming down the length of the acrylic nails.
- Coarse Nail File (100/180 grit): To file away the top layer of gel polish and acrylic.
- Acetone: The most effective solvent for dissolving acrylic. Ensure it is 100% pure acetone.
- Cotton Balls: To soak in acetone and apply to the nails.
- Aluminum Foil: To wrap around the cotton balls and nails, trapping the acetone.
- Cuticle Pusher: To gently push away the softened acrylic. Opt for a metal or wooden cuticle pusher.
- Nail Buffer: To smooth out the surface of the natural nail after removal.
- Cuticle Oil: To rehydrate and nourish the nails and surrounding skin.
- Optional: A small bowl for soaking (if using the soaking method), petroleum jelly to protect the skin around your nails.
Step-by-Step Removal Process
Now that you have your tools ready, follow these steps to safely and effectively remove acrylic nails with gel polish:
Step Trim the Acrylic Nails
Use nail clippers to trim down the length of the acrylic nails. This reduces the amount of acrylic that needs to be dissolved, shortening the overall removal time. Be careful not to cut too close to your natural nail to avoid injury.
Step File Away the Gel Polish and Acrylic
Using a coarse nail file (100/180 grit), gently file away the top layer of gel polish. The goal is to break the seal and thin out the acrylic layer. Focus on the surface and avoid filing down to your natural nail. This process helps the acetone penetrate more effectively. Be patient and work methodically, ensuring you cover the entire surface of each nail.
Step Protect Your Skin
Apply a thin layer of petroleum jelly around your cuticles and the skin surrounding your nails. This creates a barrier that protects your skin from the drying effects of acetone. Alternatively, you can use cuticle oil, though petroleum jelly provides a more robust shield.
Step Soak Cotton Balls in Acetone
Soak cotton balls in 100% pure acetone. Ensure the cotton balls are thoroughly saturated but not dripping. Acetone is the key ingredient in breaking down the acrylic polymer.
Step Apply Acetone to Nails
Place a soaked cotton ball directly onto each nail, ensuring it covers the entire surface of the acrylic. The acetone needs to be in direct contact with the acrylic to dissolve it effectively.
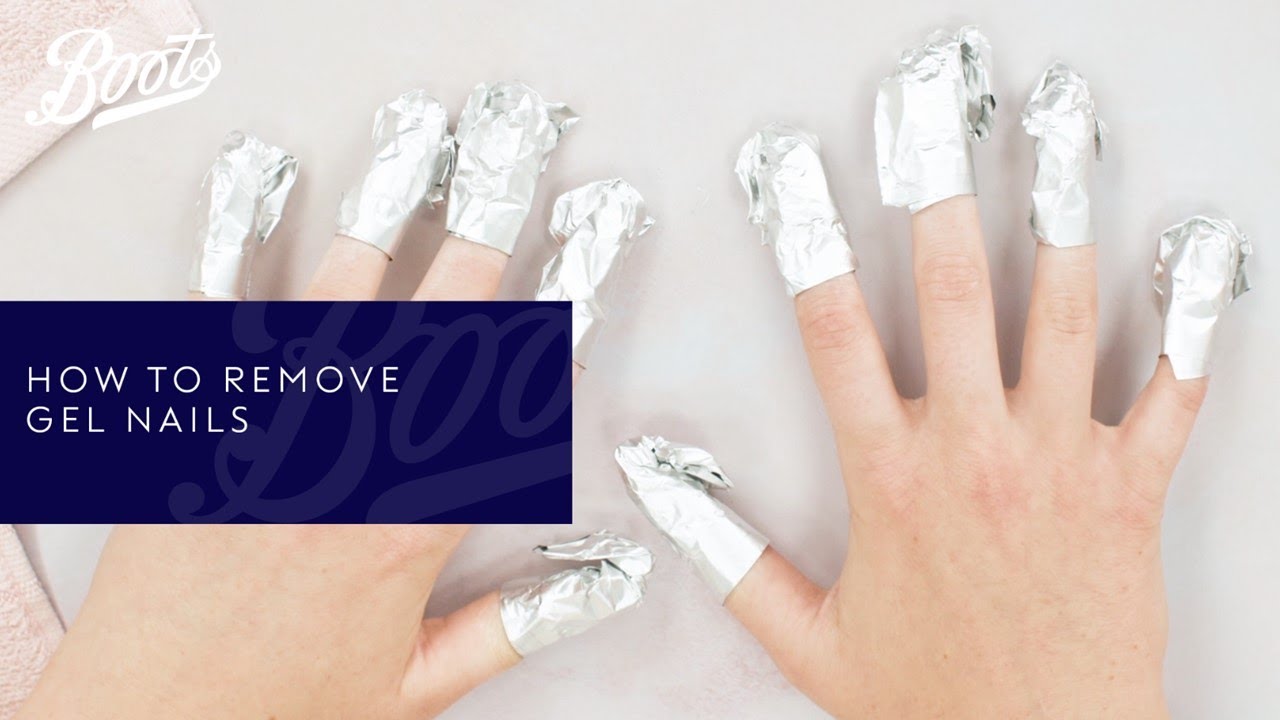
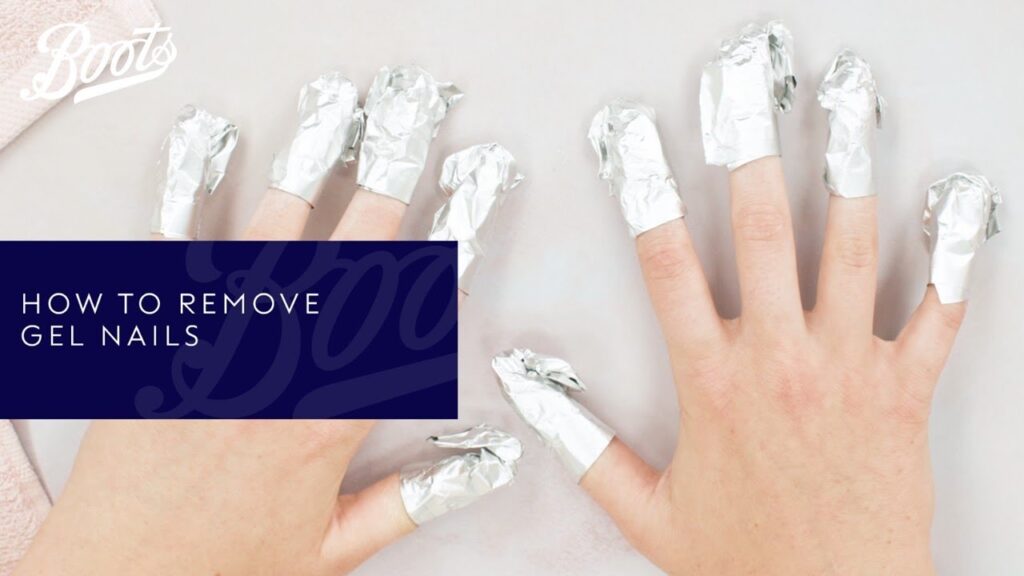
Step Wrap with Aluminum Foil
Wrap each nail tightly with aluminum foil. The foil helps to keep the cotton ball in place and traps the acetone, preventing it from evaporating too quickly. This creates a concentrated environment that accelerates the dissolving process. Ensure the foil is snug but not too tight to cut off circulation.
Step Wait Patiently
Allow the acetone to soak for at least 15-20 minutes. The soaking time may vary depending on the thickness of the acrylic and the type of gel polish used. Check one nail after 15 minutes to see if the acrylic has softened. If not, re-wrap and soak for another 5-10 minutes. Patience is key to avoiding damage to your natural nails. Avoid the temptation to peel or scrape off the acrylic prematurely.
Step Gently Remove Softened Acrylic
After the soaking period, remove the foil and cotton balls. The acrylic should have softened and become gummy. Use a cuticle pusher to gently push away the softened acrylic from your natural nail. Work from the cuticle area towards the free edge. If the acrylic is still hard, re-soak for a few more minutes.
Step Buff and Smooth
Once all the acrylic has been removed, use a nail buffer to smooth out the surface of your natural nail. This will help to remove any remaining residue and create a smooth base. Be gentle and avoid over-buffing, as this can weaken the nail.
Step Hydrate and Nourish
Acetone can be very drying, so it’s crucial to rehydrate your nails and cuticles. Apply a generous amount of cuticle oil to each nail and massage it into the surrounding skin. This will help to restore moisture and promote healthy nail growth. You can also apply a nourishing hand cream to further hydrate your skin.
Alternative Removal Methods
While the foil wrap method is the most common and effective, there are alternative methods for how to remove acrylic nails with gel polish. However, these methods may be less effective or more time-consuming.
Soaking Method
This method involves soaking your fingertips directly in a bowl of acetone. While it can be effective, it also exposes more of your skin to the drying effects of acetone. To minimize skin exposure, apply petroleum jelly liberally around your nails. Soak for 20-30 minutes, checking periodically to see if the acrylic has softened. Use a cuticle pusher to remove the softened acrylic.
Electric File (E-File) Method
Using an electric file requires skill and precision to avoid damaging the natural nail. This method involves carefully filing down the acrylic with an e-file until only a thin layer remains. Then, the remaining acrylic can be soaked off with acetone. This method is best left to professionals, as improper use of an e-file can cause significant damage.
Common Mistakes to Avoid
Avoiding common mistakes is crucial for a safe and successful removal process. Here are some pitfalls to watch out for:
- Peeling or Prying: Never peel or pry off acrylic nails. This can strip layers of your natural nail and cause significant damage.
- Insufficient Soaking: Not soaking long enough can make it difficult to remove the acrylic, leading to unnecessary force and potential damage.
- Using Impure Acetone: Using acetone that is not 100% pure may not effectively dissolve the acrylic, prolonging the removal process.
- Neglecting Cuticle Care: Failing to protect and hydrate your cuticles can lead to dryness, cracking, and even infection.
- Over-Buffing: Over-buffing the natural nail can weaken it, making it more susceptible to breakage and damage.
Post-Removal Nail Care
After removing acrylic nails with gel polish, your natural nails may feel weak and brittle. Proper post-removal care is essential to restore their strength and health. Here are some tips:
- Apply Cuticle Oil Regularly: Use cuticle oil multiple times a day to keep your nails and cuticles hydrated.
- Use a Nail Strengthener: Apply a nail strengthener or hardener to help protect and fortify your nails.
- Keep Nails Short: Trim your nails short to prevent breakage and allow them to grow out healthy.
- Moisturize Hands Frequently: Use a rich hand cream to keep your hands and nails hydrated.
- Consider a Break from Enhancements: Give your nails a break from acrylics and gel polish to allow them to recover and rebuild their strength.
- Eat a Healthy Diet: A diet rich in vitamins and minerals can promote healthy nail growth.
When to Seek Professional Help
While removing acrylic nails at home is possible, there are times when seeking professional help is the best option. If you experience any of the following, consult a nail technician or dermatologist:
- Severe Nail Damage: If your nails are severely damaged, thin, or brittle.
- Signs of Infection: If you notice any signs of infection, such as redness, swelling, or pus.
- Difficulty Removing Acrylic: If you are struggling to remove the acrylic safely and effectively.
Conclusion
Removing acrylic nails with gel polish requires patience, the right tools, and a careful approach. By following these steps and avoiding common mistakes, you can safely remove your acrylic nails at home without damaging your natural nails. Remember to prioritize nail health and provide proper post-removal care to restore strength and promote healthy growth. Whether you choose the foil wrap method or explore alternative techniques, understanding the process is key to achieving successful results. Always prioritize the health of your natural nails and seek professional help when needed. [See also: How to Care for Your Nails After Acrylic Removal] [See also: The Best Nail Strengtheners for Damaged Nails]
