Bore Gauge Setting Steps: A Comprehensive Guide
Accurate measurement is paramount in engineering and manufacturing. Among the precision tools available, the bore gauge stands out for its ability to measure internal diameters with high accuracy. Properly setting a bore gauge is crucial for obtaining reliable measurements. This comprehensive guide will walk you through the essential bore gauge setting steps, ensuring you achieve precise and consistent results. Whether you’re a seasoned machinist or a student learning the ropes, understanding these steps will significantly improve your measurement accuracy.
Understanding Bore Gauges
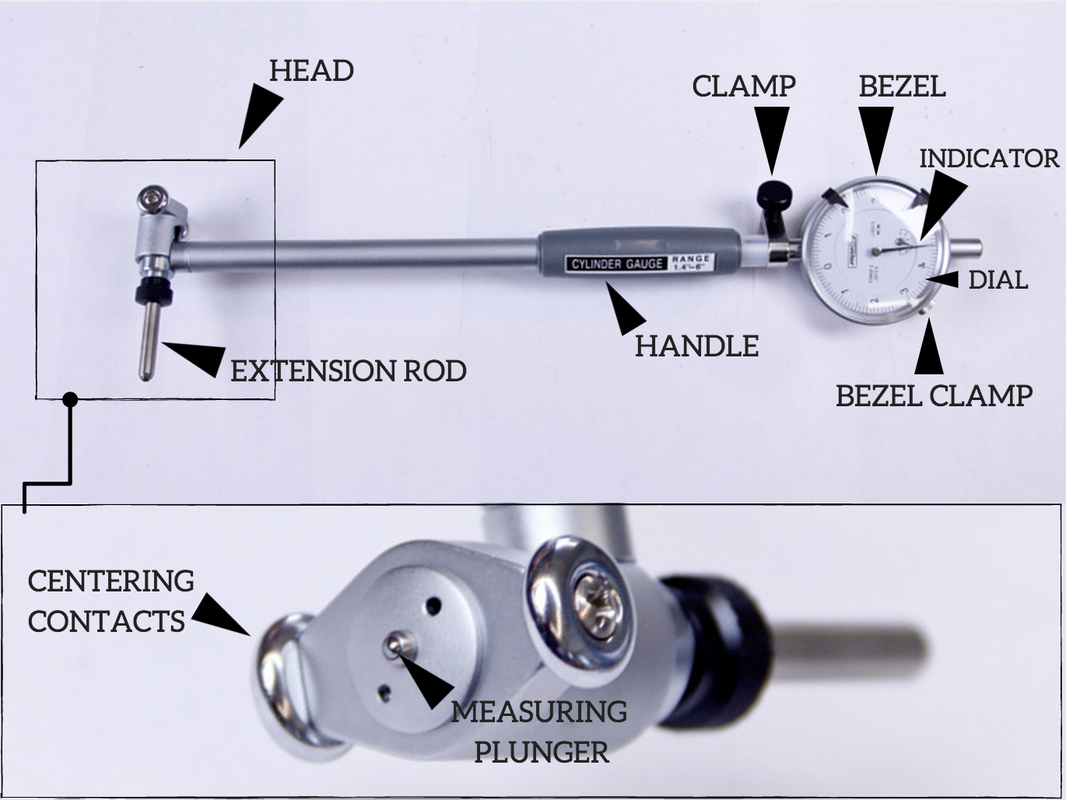
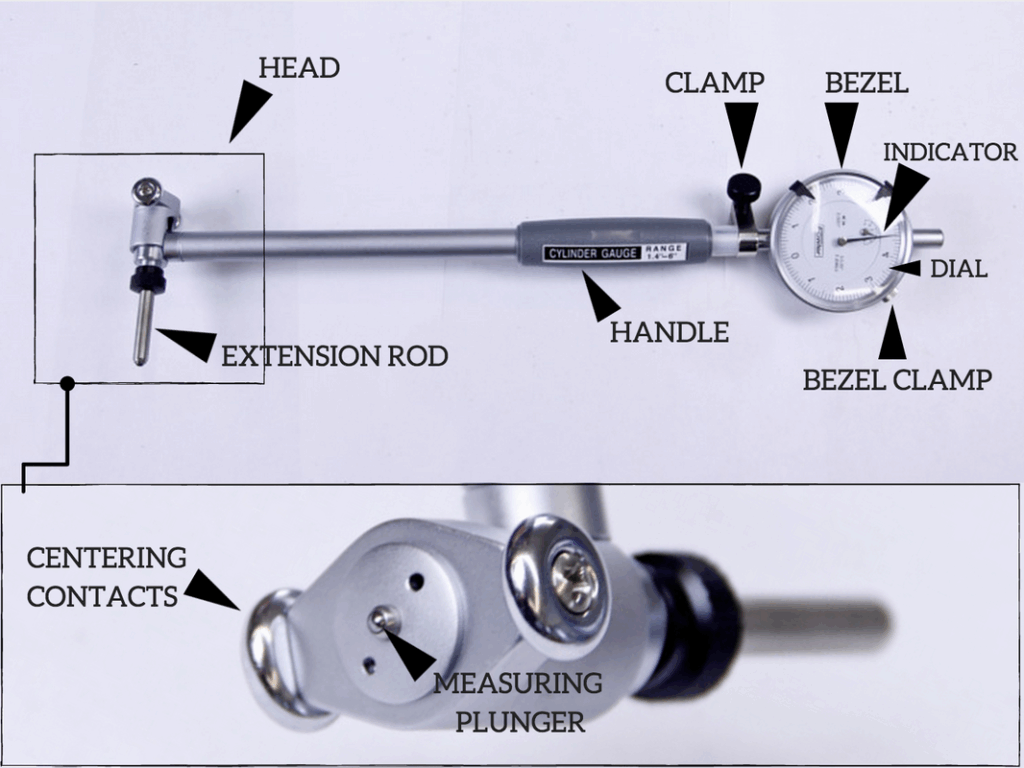
Before diving into the setting steps, it’s essential to understand what a bore gauge is and how it works. A bore gauge is a precision instrument used to measure the internal diameter of holes or cylinders. It typically consists of a measuring head, a dial indicator, and extension rods. The measuring head contains two or more contact points that expand outward to touch the internal surface of the bore. The dial indicator displays the measurement, allowing for precise readings.
There are several types of bore gauges, including:
- Dial Bore Gauges: These are the most common type, using a dial indicator to display measurements.
- Digital Bore Gauges: These gauges use a digital display for easier reading and often offer features like data logging.
- Small Hole Gauges: Designed for measuring very small bores, typically using a ball-end contact point.
- Telescoping Gauges: Used for transferring internal measurements to an external measuring tool like a micrometer.
Essential Tools and Equipment
Before you begin the bore gauge setting steps, gather the necessary tools and equipment:
- Bore Gauge: Select the appropriate bore gauge for the size of the bore you need to measure.
- Setting Ring or Micrometer: A setting ring with a known diameter or a precision micrometer is essential for calibrating the bore gauge.
- Dial Indicator: Ensure the dial indicator is clean and in good working condition.
- Extension Rods: Use the correct extension rods to match the depth of the bore.
- Clean Cloth: To wipe down the bore gauge and setting ring/micrometer.
- Calibration Certificate (Optional): For high-precision work, a calibration certificate for your setting ring or micrometer is recommended.
Bore Gauge Setting Steps: A Detailed Walkthrough
Follow these detailed bore gauge setting steps to ensure accurate measurements:
Step 1: Clean the Components
Cleanliness is crucial for accurate measurements. Use a clean cloth to wipe down the bore gauge, setting ring (or micrometer), and the bore you intend to measure. Remove any dirt, debris, or oil that could affect the reading. Even small particles can introduce errors in your measurement.
Step 2: Assemble the Bore Gauge
Assemble the bore gauge with the appropriate extension rods for the depth of the bore. Ensure all connections are secure. Double-check that the measuring head is properly attached and that the dial indicator is securely mounted. Loose connections can lead to inaccurate readings.
Step 3: Select the Appropriate Setting Standard
Choose a setting ring or micrometer that is close to the nominal diameter of the bore you are measuring. This will ensure that the bore gauge is operating within its optimal range. Using a setting standard that is significantly different from the bore size can reduce accuracy.
Step 4: Setting with a Setting Ring
If using a setting ring:
- Place the setting ring on a clean, stable surface.
- Insert the bore gauge into the setting ring.
- Adjust the bore gauge until the measuring points contact the inner surface of the setting ring.
- Rotate the dial indicator bezel until the needle is aligned with zero. This sets the bore gauge to the known diameter of the setting ring.
- Gently rock the gauge back and forth to find the smallest reading on the dial indicator. This ensures the gauge is perpendicular to the setting ring’s surface, providing the most accurate setting.
Step 5: Setting with a Micrometer
If using a micrometer:
- Open the micrometer to the desired setting (the nominal diameter of the bore).
- Hold the micrometer securely in a vise or stand.
- Insert the bore gauge between the micrometer anvils.
- Adjust the bore gauge until the measuring points contact the micrometer anvils.
- Rotate the dial indicator bezel until the needle is aligned with zero. This sets the bore gauge to the micrometer’s reading.
- As with the setting ring, gently rock the gauge to find the smallest reading, ensuring perpendicularity.
Step 6: Verify the Setting
After setting the bore gauge, it’s good practice to verify the setting. Remove the bore gauge from the setting ring or micrometer and re-insert it. Check that the dial indicator still reads zero. If it doesn’t, repeat the setting process. This ensures that the setting is stable and reliable.
Step 7: Measuring the Bore
Now that the bore gauge is set, you can proceed to measure the bore. Insert the bore gauge into the bore you want to measure. Gently rock the gauge back and forth to find the smallest reading on the dial indicator. This is the actual diameter of the bore. Be sure to take multiple measurements at different points within the bore to check for variations in diameter, such as ovality or taper. These variations can be critical in assessing the bore’s condition and suitability for its intended purpose.
Step 8: Interpreting the Readings
The dial indicator will show the difference between the bore diameter and the setting standard. If the needle moves clockwise, the bore is larger than the setting standard. If it moves counterclockwise, the bore is smaller. Note the reading and add or subtract it from the setting standard to determine the actual bore diameter.
Tips for Accurate Measurements
To ensure the most accurate measurements, consider these additional tips:
- Temperature Control: Temperature variations can affect the accuracy of measurements. Allow the bore gauge, setting standard, and workpiece to reach the same temperature before measuring.
- Proper Handling: Handle the bore gauge and setting standard carefully to avoid damage. Avoid dropping or bumping them, as this can affect their accuracy.
- Calibration: Regularly calibrate your bore gauge and setting standard to ensure they are within acceptable tolerances. Calibration is essential for maintaining accuracy over time.
- Consistent Technique: Use a consistent technique when setting and measuring. This will help to minimize variations in your readings.
- Proper Lighting: Ensure adequate lighting to clearly see the dial indicator and the bore you are measuring.
- Check for Wear: Regularly inspect the measuring points and dial indicator for wear or damage. Replace any worn or damaged components.
Troubleshooting Common Issues
Here are some common issues you might encounter and how to resolve them:
- Inconsistent Readings: This could be due to loose connections, dirt or debris, or temperature variations. Check all connections, clean the components, and allow the parts to reach the same temperature.
- Difficulty Zeroing the Dial Indicator: Ensure the bore gauge is properly assembled and that the setting standard is clean and accurate. If the issue persists, the dial indicator may need adjustment or replacement.
- Measuring Points Sticking: This could be due to dirt or corrosion. Clean the measuring points with a suitable solvent and lubricate them lightly.
- Bore Gauge Not Entering the Bore: Check that the bore gauge is the correct size for the bore you are measuring. Also, ensure there are no obstructions in the bore.
The Importance of Regular Calibration
Regular calibration is critical for maintaining the accuracy of your bore gauge. Over time, wear and tear can affect the precision of the instrument. Calibration involves comparing the bore gauge’s readings to a known standard and making adjustments as needed. The frequency of calibration depends on the usage and environment, but it is generally recommended to calibrate bore gauges at least once a year, or more frequently if they are used extensively or in harsh conditions. A calibration certificate provides documented proof of the bore gauge’s accuracy and traceability to national or international standards.
Conclusion
Mastering the bore gauge setting steps is fundamental for achieving accurate internal diameter measurements. By following the detailed steps outlined in this guide, you can ensure that your bore gauge is properly set and that your measurements are reliable. Remember to clean the components, assemble the bore gauge correctly, select the appropriate setting standard, and verify the setting before measuring the bore. Additionally, consider the tips for accurate measurements and troubleshoot any common issues that may arise. Regular calibration is also essential for maintaining the accuracy of your bore gauge over time. With practice and attention to detail, you can confidently use a bore gauge to obtain precise and consistent measurements in a variety of applications. Accurate measurements lead to better quality control, improved manufacturing processes, and ultimately, superior products. This makes the time invested in learning and perfecting these bore gauge setting steps well worth the effort. Remember, precision is not just a goal; it’s a practice.
By meticulously following these bore gauge setting steps, you are well on your way to achieving the highest level of precision in your measurements, regardless of your experience level. The consistent application of these principles will not only improve the accuracy of your work but also enhance your understanding of metrology and precision measurement techniques. Investing in the proper tools, training, and adherence to these procedures will pay dividends in the form of increased efficiency, reduced errors, and improved overall quality in your projects. The meticulous attention to detail required in bore gauge setting steps is a hallmark of professionalism and a commitment to excellence in the field of engineering and manufacturing.
[See also: Dial Indicator Calibration Guide]
[See also: Micrometer Reading Techniques]
